Ya es posible personalizar el esquema de prioridades en Jira Cloud
El uso de un sistema de prioridades en la gestión de proyectos es un elemento fundamental para optimizar los tiempos de trabajo y la colaboración entre miembros del equipo. Hasta hace muy poco, los usuarios de Jira Cloud teníamos que trabajar con un único esquema de prioridades, común a todos los proyectos.
Sin embargo, recientemente se ha anunciado la posibilidad de creación de más de un Esquema de Prioridades en Jira Cloud.
Gracias a esta nueva funcionalidad, ya no es necesario que todos los proyectos de un mismo site utilicen las mismas prioridades, sino que es posible customizarlos según sus necesidades reales. ¿Cómo hacerlo? Limpiando el desplegable de prioridades de los elementos que no sean útiles o pertinentes para un proyecto concreto, aún cuando estén en uso en otros proyectos diferentes.
Esta funcionalidad ya existía en Server/DC; durante las migraciones a Cloud, los proyectos terminaban con múltiples prioridades no deseadas. Estaban utilizando esquemas de prioridades en la plataforma On Premise correspondiente, y al no existir su homólogo en Cloud, todas las prioridades aparecían disponibles para todos los proyectos del site.
Cómo crear esquemas de prioridades
Sigue estos pasos, para crear nuevos esquemas de prioridades en tu instancia de Jira Cloud:
Desde Administration → Issues ahora tenemos una nueva sección, Priorities → Priority schemes.
Por defecto veremos creado el Default priority scheme, donde se guardan todas las prioridades del sistema.
Pero ahora podemos crear nuestro propio esquema de prioridades desde el botón «Add priority scheme» que aparece en la parte superior derecha de la interfaz.
En la primera pestaña de la ventana añadiremos el nombre que queremos dar al esquema y, opcionalmente, una descripción.
En el desplegable inferior seleccionamos las categorías de prioridades que queremos usar en este esquema. Recuerda que la prioridad debe existir ya creada en la instancia, para que puedas seleccionarla para tu nuevo esquema.
Veremos que la primera categoría añadida se establecerá como prioridad por defecto. ¿Cómo sustituirla? Con un gesto san sencillo como pasar el ratón por encima.
En la segunda pestaña seleccionaremos los proyectos que queremos asociar a este esquema de prioridades. Es posible seleccionar todos en la casilla de «Select all», personalizar la selección e incluso buscar proyectos desde la misma ventana.
Es posible que los proyectos seleccionados tengan categorías de prioridades diferentes a las del nuevo esquema. En este caso, aparecerá una nueva pantalla para mapear las prioridades actuales con las nuevas y finalmente añadir el esquema a los proyectos seleccionados.
Puedes ver todos los pasos mencionados en este vídeo tutorial:
Cómo editar un esquema de prioridades
Para editar el esquema de prioridades desde el propio proyecto en Jira Cloud, hay que hacerlo desde la página de Priority schemes.
Es tan sencillo como pulsar el botón de Actions (…) a la derecha del esquema que queremos editar. Esto abrirá la misma ventana que usamos a la hora de crear el esquema inicialmente.
Además, si tenemos muchos proyectos en un mismo esquema de prioridades (o si no tenemos ninguno), el contador en sí es un botón que abre directamente la pestaña Projects de la ventana de edición.
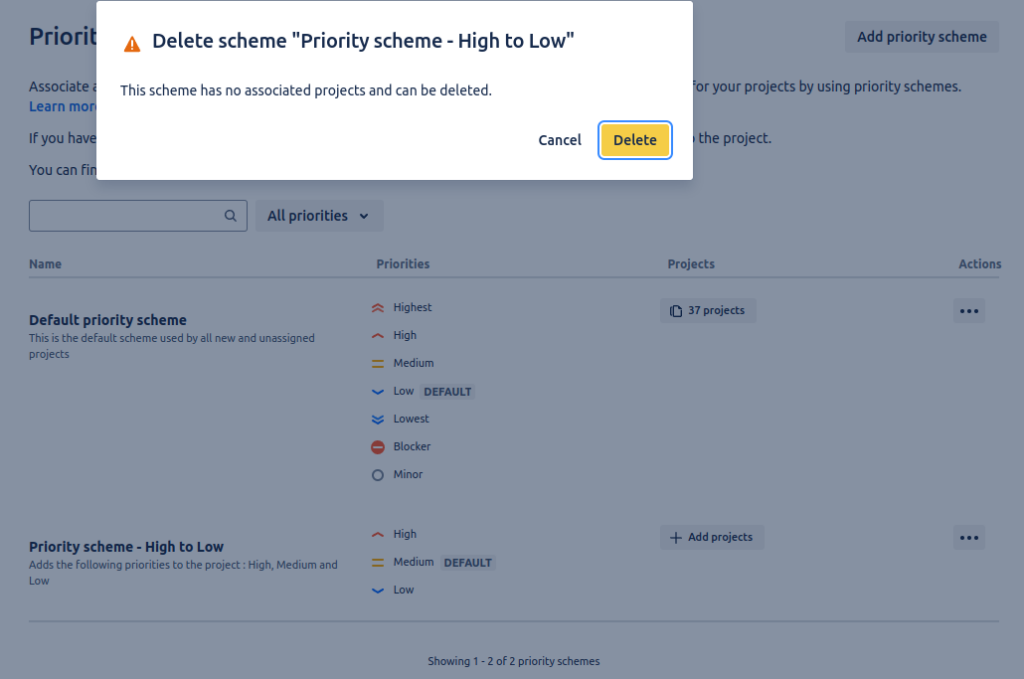
Cómo eliminar un esquema de prioridades
Si un esquema de prioridades, ya tiene un proyecto asociado, no podemos eliminarlo. Antes de eliminar el esquema es necesario cambiarlo en todos los proyectos que lo tengan asociado.
 Tampoco es posible eliminar un proyecto de un esquema concreto (deseleccionando su casilla y guardando el esquema), ya que, aunque no daría ningún error, el cambio no se haría efectivo.
¿Cómo podemos entonces eliminar un esquema de prioridades? Bien, el primer paso es añadir los proyectos a otro esquema ya existente, que puede ser el Default.
Una vez nuestro esquema de prioridades esté ya sin ningún proyecto asociado, podremos eliminarlo usando la opción Delete del menú de acciones.
Recuerda que mantener una instancia estandarizada y simplificada te ayudará a su mantenimiento y posteriores evoluciones. Esta nueva funcionalidad abre un mundo de posibilidades para esos proyectos que tienen necesidades muy específicas y que no se comparten con otros proyectos. Eso sí, úsala con cabeza 😉