Beta version of Assets Data Manager now available

Atlassian has announced the availability of the Beta version of Assets Data Manager, a key tool for enterprise asset management. This release is an important step following the acquisition of AirTrack in 2023. With that step, Atlassian strengthened its offering in asset and configuration management, consolidating its solution under the new Assets Data Manager brand.
The tool enables organizations to efficiently import assets, either via CSV files or through adapters that integrate existing enterprise asset management systems.
In addition, Assets Data Manager makes it easy to normalize data, create custom filters and generate detailed reports. These capabilities improve team visibility and optimize strategic decision making by providing a clear, centralized view of the organization’s asset ecosystem.
This release reinforces Atlassian’s commitment to innovation in IT and business service management – the Beta version is now available for those who wish to explore its potential!
How to enable the Data Manager?
We will go to the Assets section in the Configuration menu to enable it.
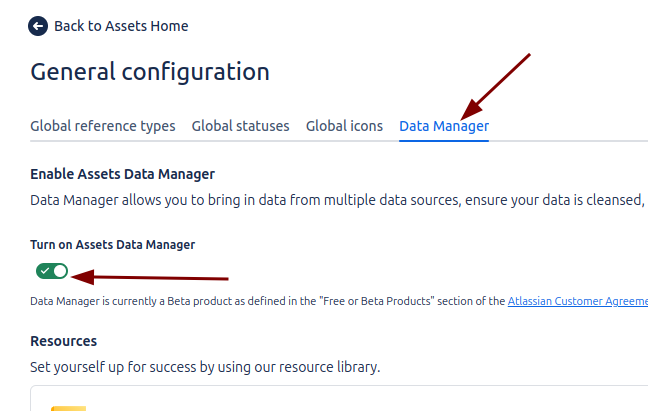
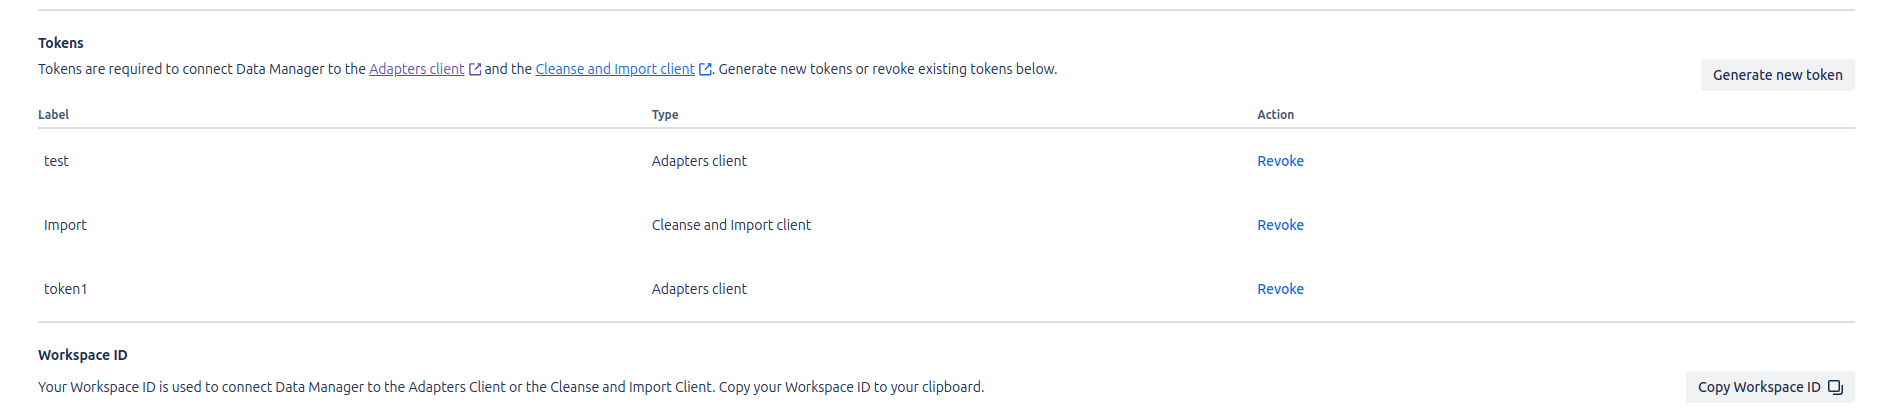
In the Assets Data Manager configuration menu, it is possible to manage access roles, generate temporary tokens (with a maximum validity of 12 months) for the execution of tasks, and consult the Workspace ID, necessary to carry out actions such as Jobs or Cleanse & Import.
Once Data Manager is activated, users can access the main Assets panel and configure the tool according to their organization’s needs. This provides centralized and flexible control for asset and workflow management.
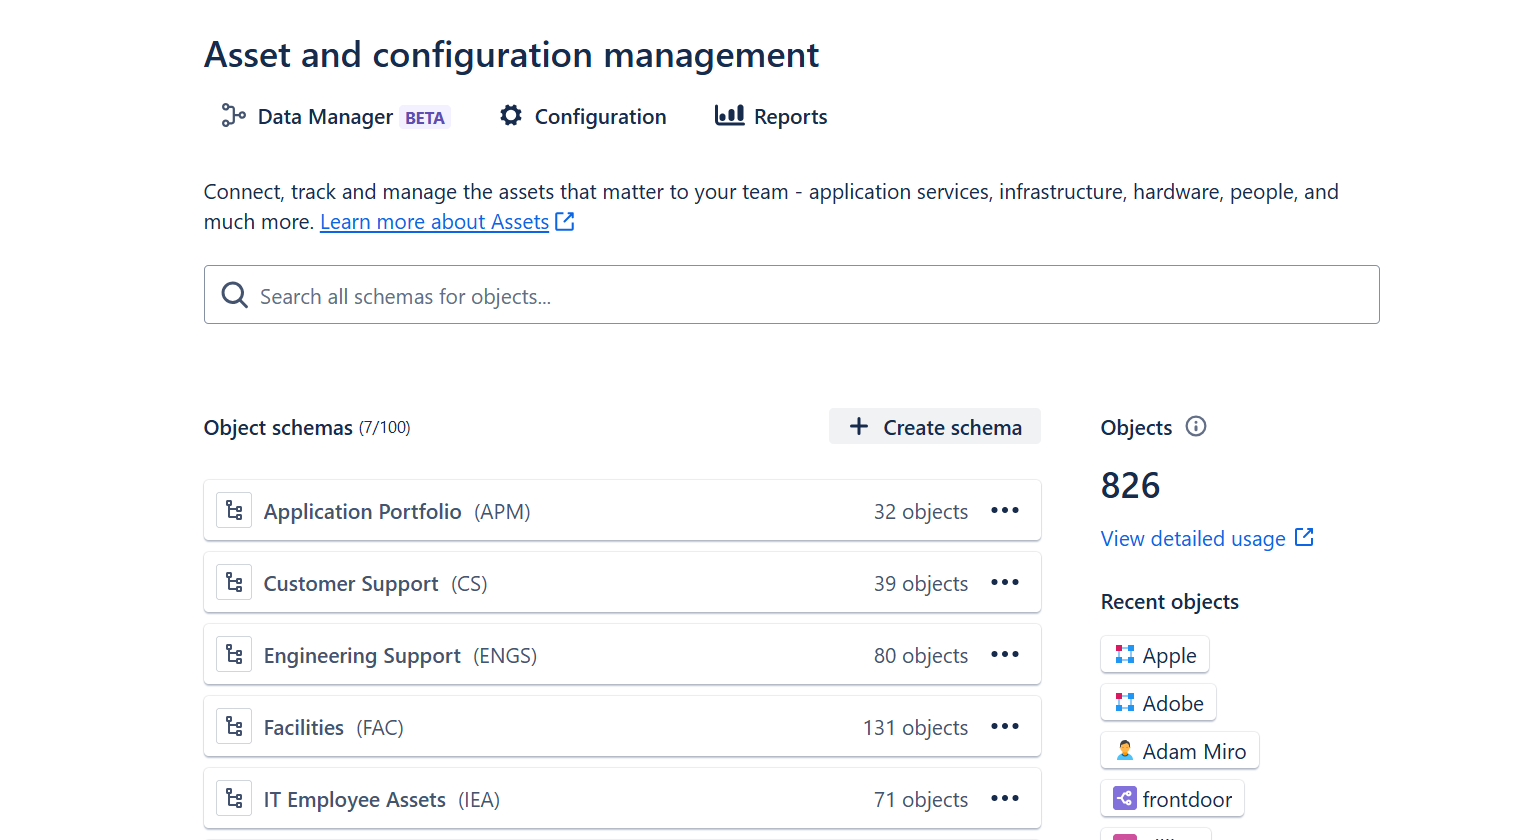
Start configuring Data Manager
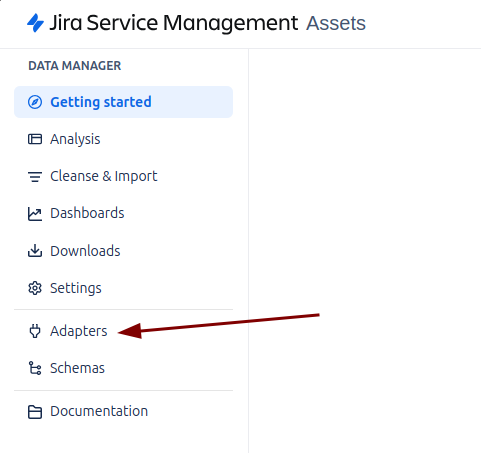
How to create Jobs on adapters
The first step in integrating Assets Data Manager is to prepare the service with which we wish to establish the connection, such as Azure, Lansweeper or ServiceNow. Each of these services has unique specifications that must be considered during configuration.
To ensure a successful integration, it is possible to refer to the specific instructions for each service directly from the corresponding section in the tool. This approach ensures that the configuration is accurate and appropriate to the characteristics of each environment, which can be consulted more specifically in this section.
Once the service has been configured in the previous step, the next step is to create a Job in Assets Data Manager. This Job will be responsible for importing the data from the previously connected tool, ensuring that the information is efficiently integrated into the platform.
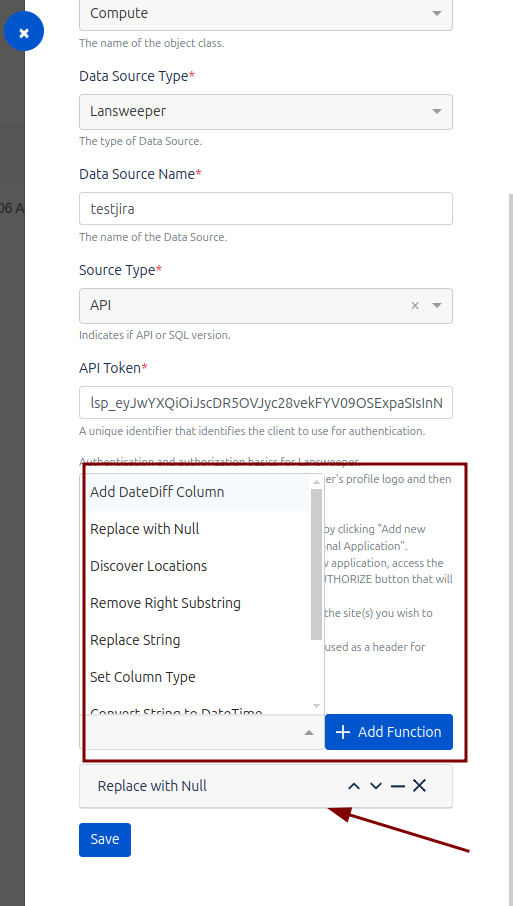
Within the Job configuration in Assets Data Manager, it is possible to define transformation rules. These rules will be executed automatically when collecting the information brought in by the Job, allowing you to modify or format the data before it is imported and stored in the system. This functionality ensures that the information conforms to the organization’s specific standards and requirements, optimizing the quality and consistency of the imported data.
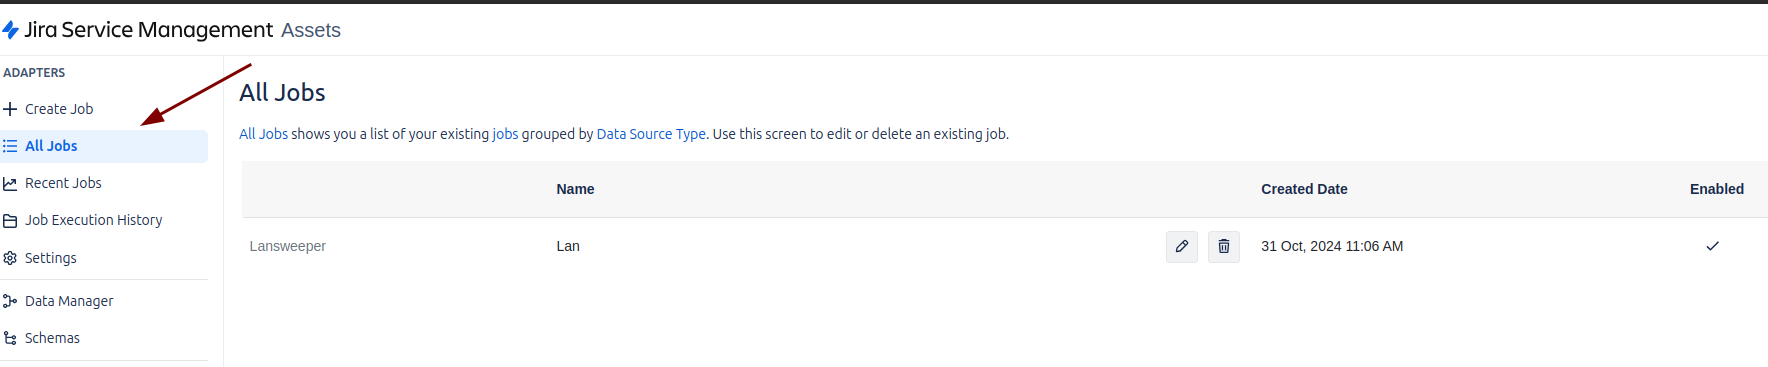
In the All Jobs section of the Assets Data Manager, you can view the Jobs that have already been enabled and configured. This area centralizes all active jobs, allowing you to monitor their status and ensure that the import and processing of data is being carried out correctly.
How to run a Job
To run the Job in Assets Data Manager, you need to download the Data Manager client from the Atlassian Marketplace. This client facilitates the connection and execution of tasks related to the assets.
Once the client is downloaded, you will need to obtain the Token and Organization ID from the Assets section in the Jira configuration. This data is essential to authenticate and correctly configure the execution of the Jobs within the Assets Data Manager environment.
Once you have downloaded and installed the Data Manager client on Windows, you can use the dm-adapters.exe command to interact with Assets Data Manager from the command line. To get help on the available commands, simply open a Command Prompt window and run the following command: dm-adapters.exe –help
This command will provide a list of options and parameters that you can use to run and configure different tasks related to Assets Data Manager adapters, such as running Jobs, configuring the connection and importing data.

To automate the execution of a Job in Assets Data Manager by means of a schedule, you can program the above command using the Windows Task Scheduler. This will allow you to run the Job periodically, without the need for manual intervention.
How to see what data the Job has brought up
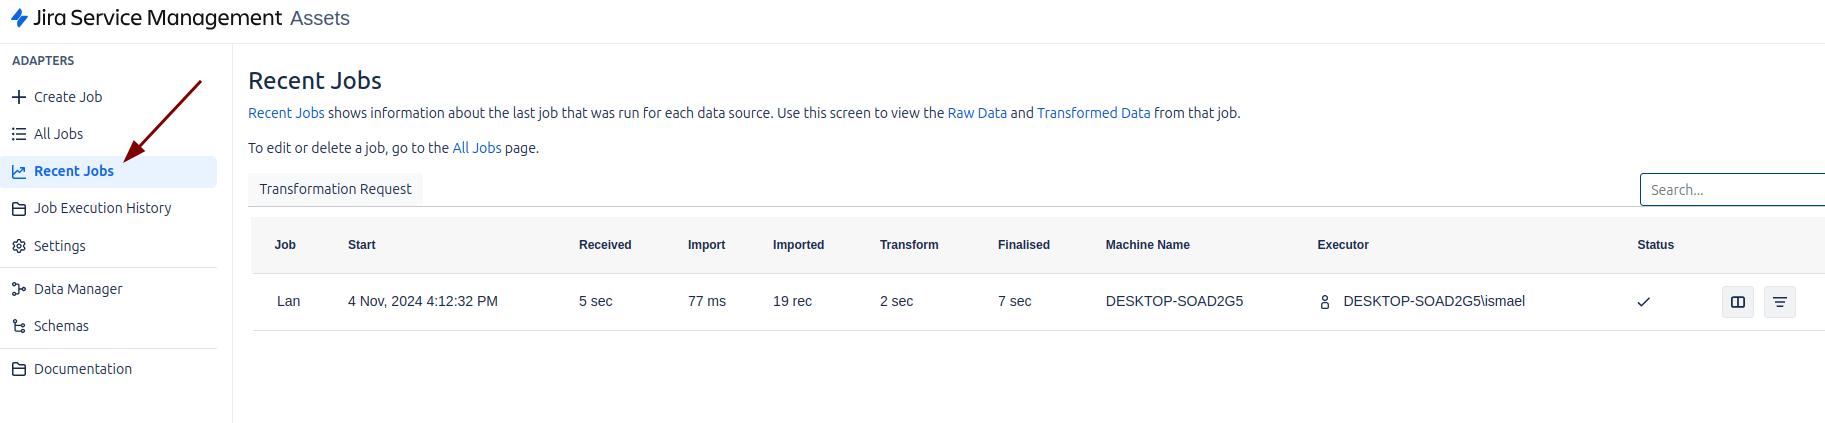
To see the status of the executed jobs, we must access the left menu and select the “Recent Jobs” option. This section will allow us to review the details of the jobs that have been recently executed, including their status, duration, and any errors or warnings that may have occurred during their execution.
In “Recent Jobs”, you will be able to:
- Consult the results of scheduled or manual Jobs.
- View the execution logs for each Job.
- Identify problems or verify that jobs have been completed correctly.
It is a very useful tool to monitor and manage Jobs efficiently.
Processing data in Data Manager
Once the Job has run successfully without errors, the next step is to process and normalize the imported data. This includes defining cleanup rules, mapping the imported fields, and running the cleanup to ensure that the data is aligned with the organization’s standards.
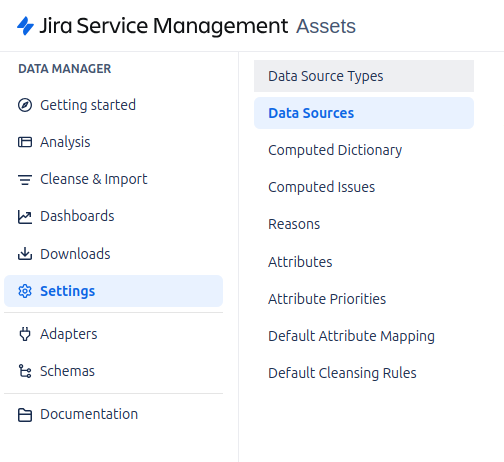
To begin normalizing and cleansing data in Assets Data Manager, the first step is to go to the Settings section.
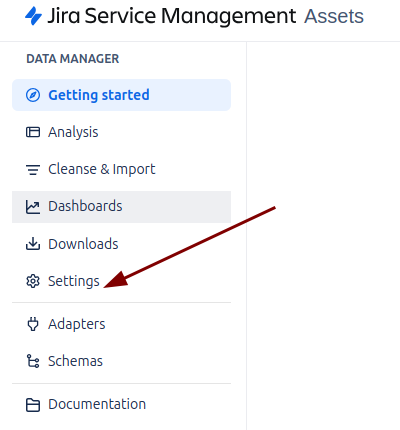
In this section we will find the following sections to configure:
Data Source Types
In this section you will find the data sources that you have previously configured in the Jobs section. By default, some examples are already included, but as you create and run Jobs, the Data Source Types will be automatically added according to the configured sources. This allows you to have control over the different data sources that are handled within the system.
Data Sources
This tab is where you will perform the key tasks of mapping, cleansing and importing data into Data Manager. Here you will be able to adjust how imported data is mapped to the correct fields within the platform, define cleansing rules to remove erroneous or duplicate data, and finally import the normalized and validated data into the system.
Computed Dictionary
This section allows you to define computed fields based on existing attributes. For example, you can create an “OSVersion” field that groups operating system values, such as “Linux” or “Windows”, and within each class, list the corresponding versions (e.g. “Ubuntu”, “Debian” for Linux, or “Windows 10”, “Windows 11” for Windows). Depending on the attribute values, the system will automatically assign the value “Linux” or “Windows” to the corresponding column.
Computed Issues
In this section you can more easily associate values to groups within the Computed Dictionary. This facilitates the organization and assignment of values within the computed fields, allowing a more structured and efficient configuration of the data.
Reasons
Here you can create different cleaning reasons to apply before importing the data. When performing a cleanse process, you can mark the data with a specific reason that explains why the data was modified or deleted. This helps to keep a clear record of the modifications made to the imported data and facilitates auditing and quality control.
Attributes
Attributes are the table fields that define the characteristics of each object class. Each object class can have attributes that represent specific properties (such as name, creation date, status, etc.). Attributes can be:
- Normal: These are attributes that do not require any additional processing.
- Computed: They are those that are calculated using rules defined in the Computed Dictionary.
Some attributes may be marked with snapshot, which means that the values of these attributes will be stored as a snapshot at a point in time, allowing comparisons between historical and future values.
Attribute Priorities
Although not specified in the document, this section usually manages the priority of attributes when there are conflicts or transformation rules must be applied. Attributes with a higher priority may overwrite the values of attributes with a lower priority during the import process.
Default Attribute Mapping
Here you define the default columns that will be mapped from the data source to the corresponding object class. This default mapping ensures that the imported data is correctly mapped to the set fields, without the need for additional configurations for each import.
Default Cleansing Rules
This section defines the default cleansing rules that will be automatically applied to all imported data. These rules may include the removal of empty values, format correction, or data validation. If necessary, these rules can be customized for each specific Job, providing flexibility in data management.
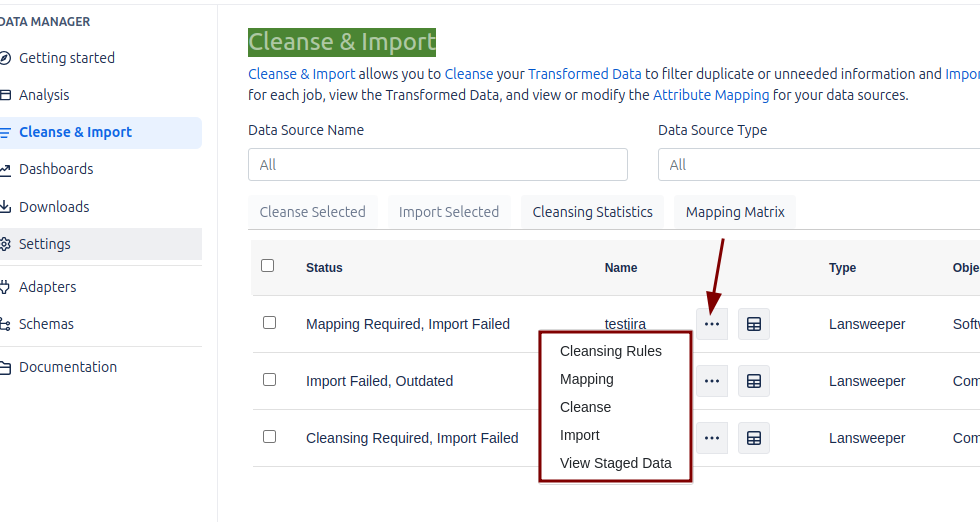
Cleanse & Import
In Assets Data Manager, the cleaning, mapping and import of data brought from the data source can be managed through a web interface.
Each time a Job is created, a corresponding record is generated in this section.
In addition to manual execution through the web interface, Cleanse and Import can also be scheduled to run automatically at specific intervals, using the Data Manager client in conjunction with the Windows Task Scheduler. This is the only way to schedule these tasks in an automated fashion.
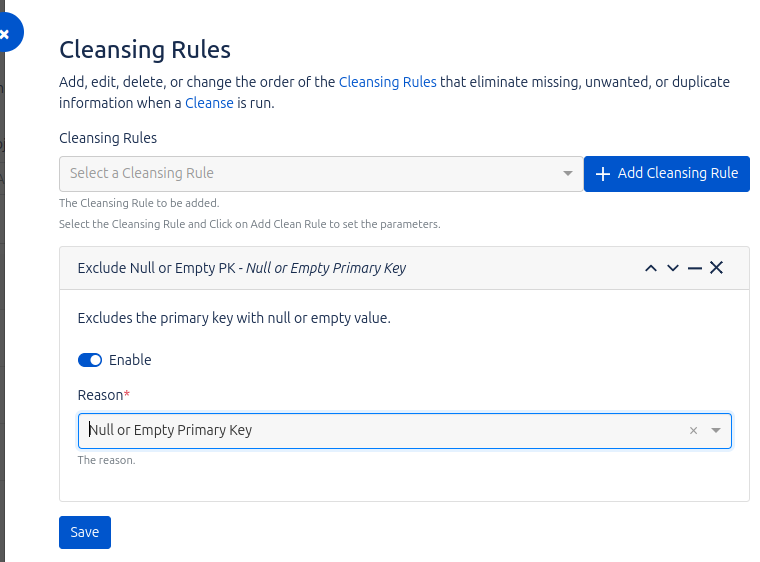
Cleansing Rules
In this section, we can configure the cleaning rules we deem necessary to optimize the quality of the data before importing it into Assets Data Manager. The product includes a set of predefined rules that can be adapted to our needs through the options offered by the system.
For example, one of the predefined rules is “Exclude null or empty primary keys”. By applying this rule, the cleaning process will prevent rows with null values in the column defined as primary key during the mapping from being copied to Data Manager. This ensures that only complete and valid records are imported.
In addition, it is important to note that each Job can have its own custom cleanup rules, which allows for greater flexibility in the configuration of the import processes and ensures that the specific requirements of each project are met.
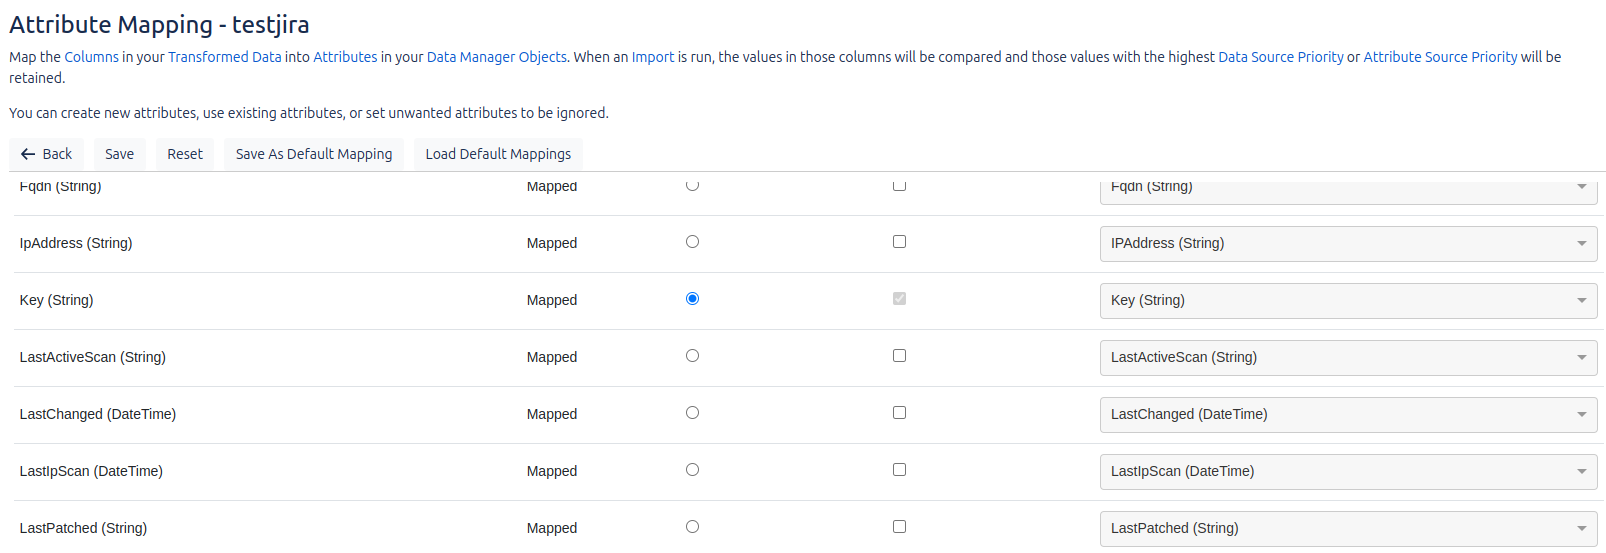
Mapping
Field mapping refers to the correspondence between the fields coming from the data sources and the fields in Data Manager. In this section, we define how the imported data should be renamed or mapped to ensure that it conforms to the Data Manager structure and nomenclature.
Cleansing
We can run the job manually at any time. In addition, during the execution, we can monitor the status of the process in real time.
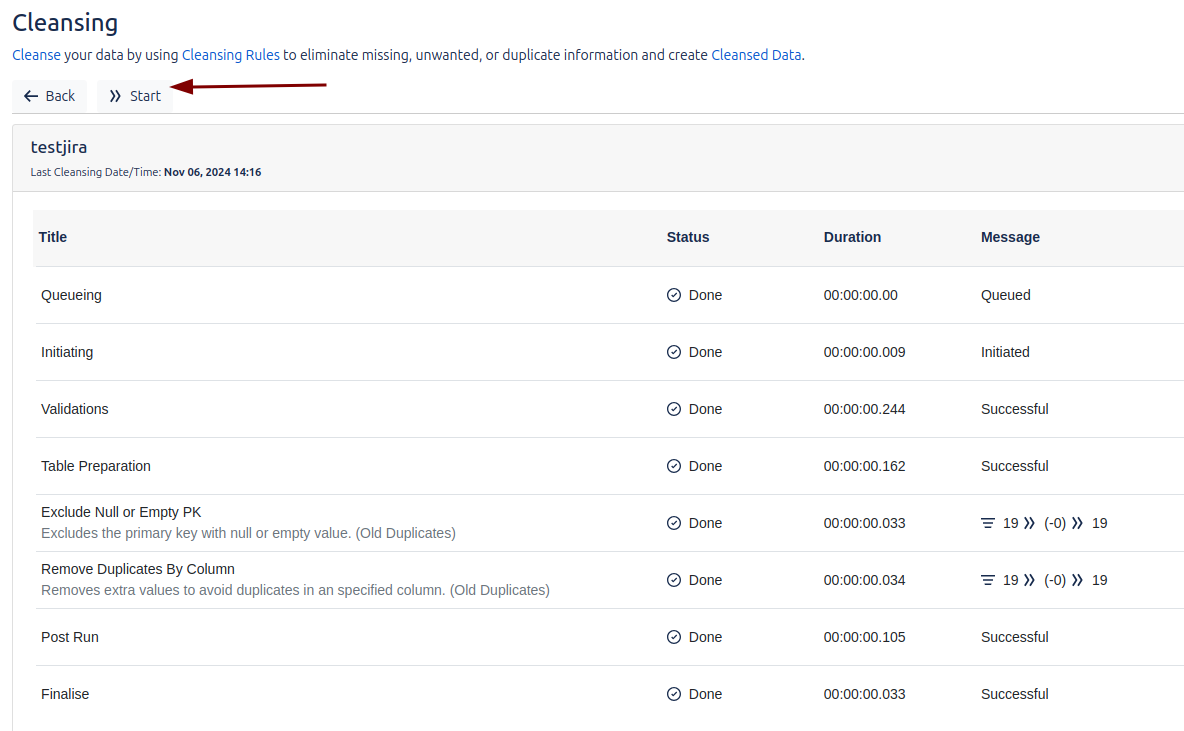
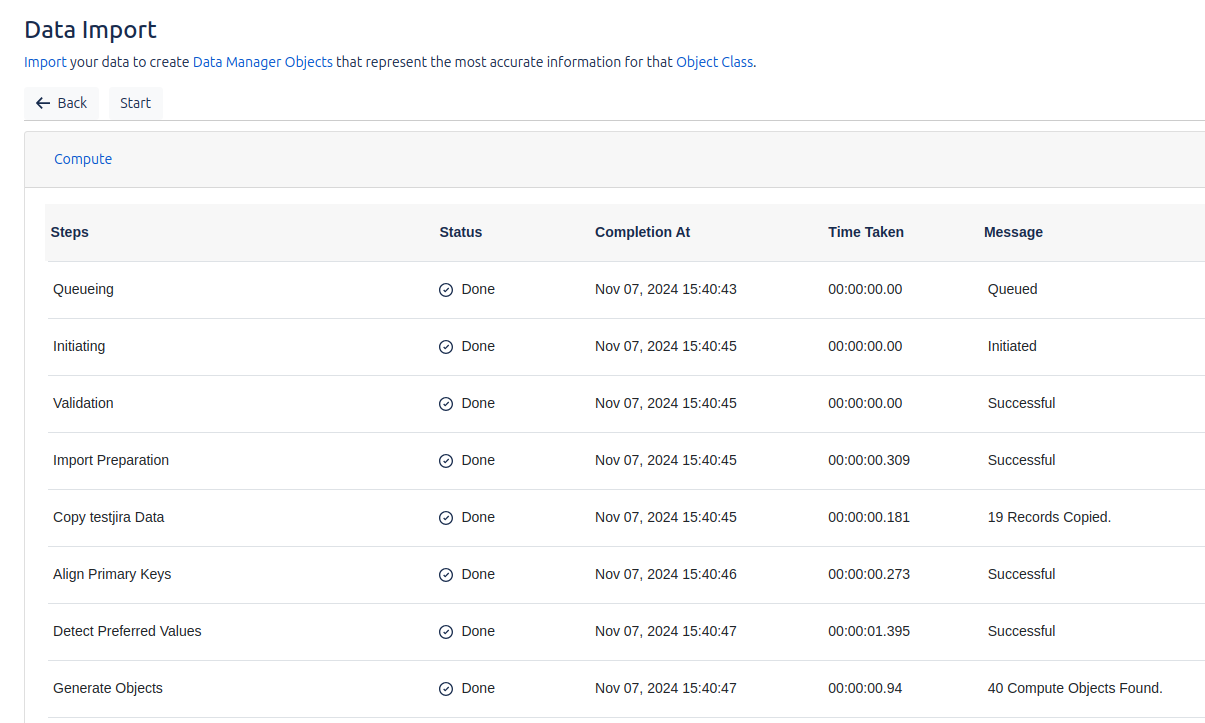
Import
We will be able to run the job manually at any time, and we will also be able to see the status of the process in real time. It is important to note that the execution of the cleaning process (cleansing) is mandatory before performing any other operation. If we try to run the job without having previously performed the cleansing, an error will be generated, which highlights the importance of following the correct workflow to ensure a successful and trouble-free import.
Once the cleanup process has been executed, we will be able to visualize the results obtained.
Data Source Staging
We can visualize the data imported from the data source, which allows us to review the information that has been transferred to the system. It is important to note that the data currently stored in Data Manager is not displayed, but only the data coming directly from the external source before being processed or stored in the platform.

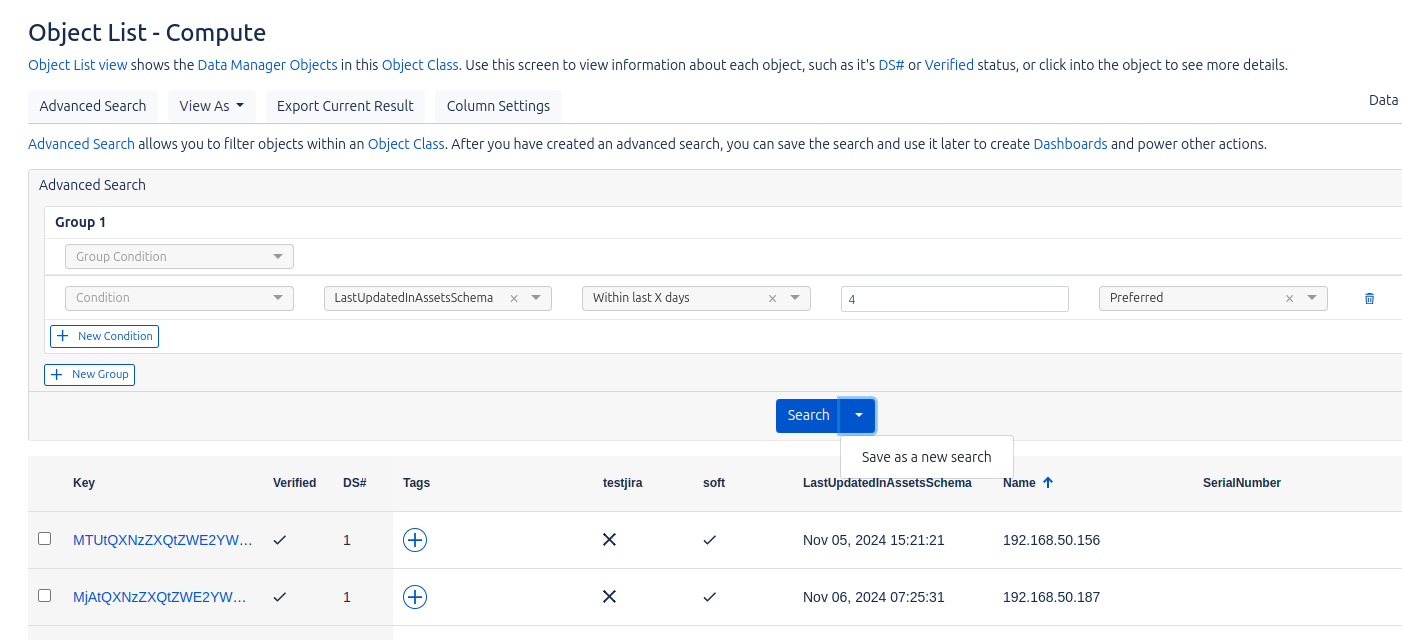
Analysis
In this section, we will analyze and filter the data that have already been cleaned and imported from the datasources to Data Manager, and that are now stored in the corresponding object classes. This organization of the data is defined by Data Manager and allows to structure them according to their type.
The main types of objects are:
- Compute: Represents computers, devices or servers.
- Network: Represents networks or network devices, such as routers or firewalls.
- People: Represents users.
- Software: Represents software products.
- Peripherals: Represents peripheral hardware, such as printers or mouse.
By clicking on each object class, we will be able to see the data stored in each one of them. In addition, we will have the option to run queries on this data and save them for later use in the dashboards, which facilitates the analysis and visualization of the information.
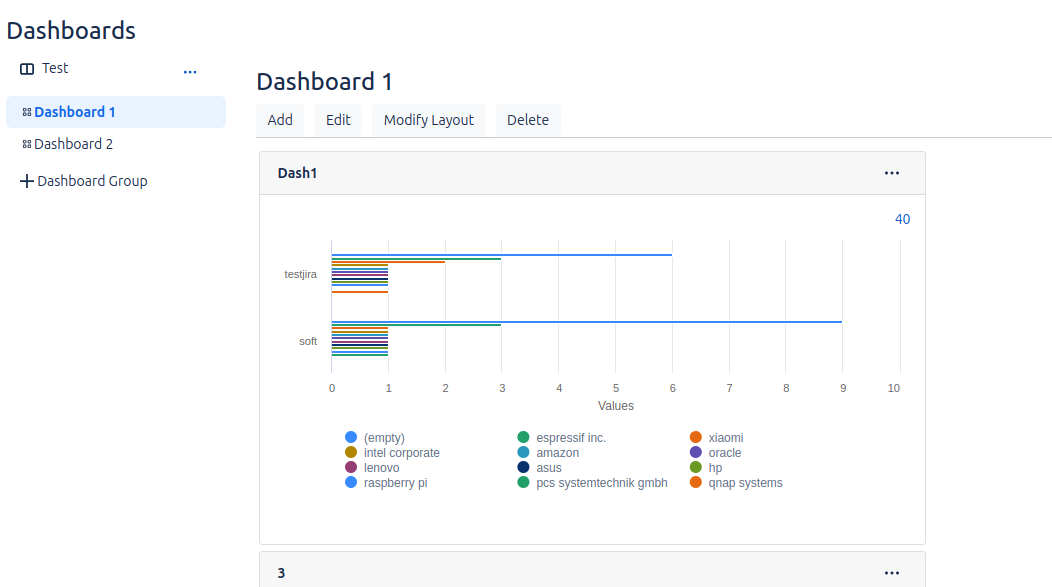
Dashboards
We will be able to represent the data stored in Analysis by means of graphs, taking advantage of the filters previously applied in that section.
Downloads
Currently, Data Manager is not yet automatically integrated with Assets. While this option is under development, the tool offers the possibility to export and import data into Assets using CSV files.
To perform an export, in the previous section of Analitycs, we can perform custom searches. From that same screen, we have the option to request the export of the data. During this process, we will be asked to provide a name to identify the export job, making it easier to manage and track.
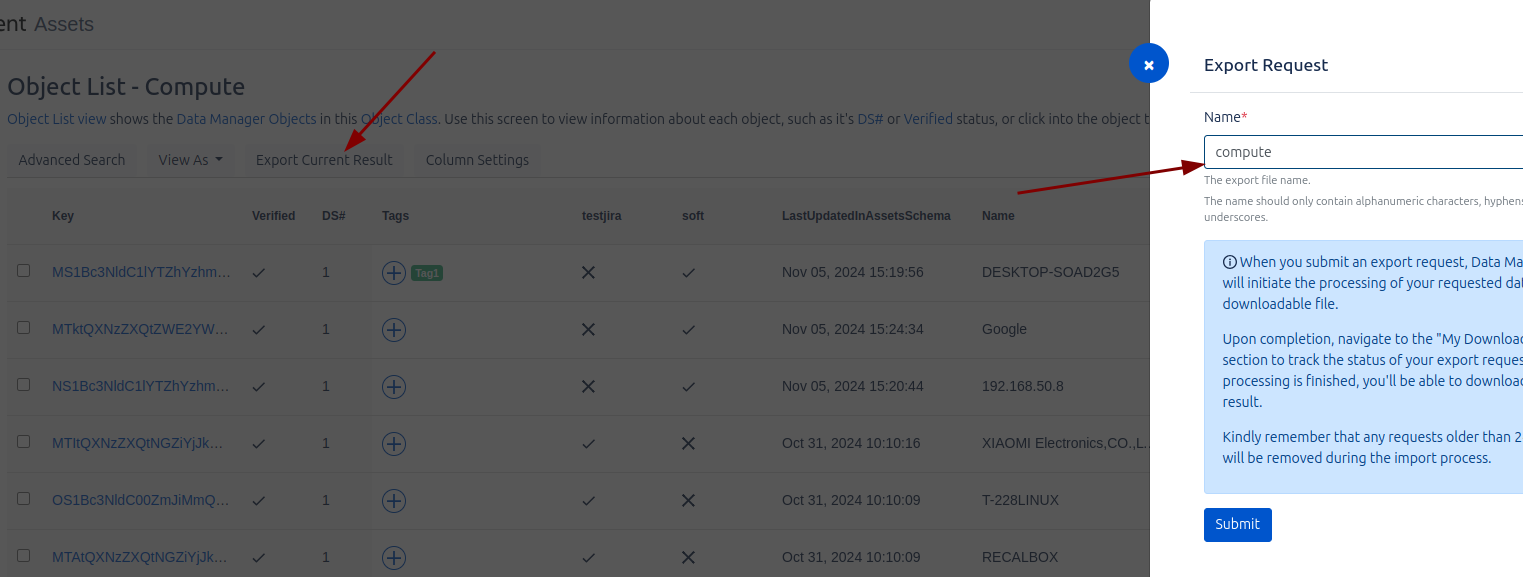
Once the export has been completed, we can go to the Downloads section to download the generated CSV file and import it into Assets.

You have probably already noticed… but this functionality is only available in the Premium and Enterprise versions of Jira Service Management, the only ones in which we can enjoy Assets for now. Remember that, if you need help managing your licenses, we can help you 😉